Handy GPS - Offline maps advanced topics

How offline maps work, and how to tile your own maps

The way offline maps are implemented is that a "MapTiles" sub-folder is created under the HandyGPS folder on your device's storage. Under this there is a sub-folder for each offline map area you download.

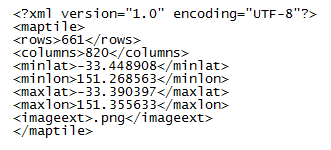
Each sub-folder contains a file called tilelist.txt which contains a list of the tiles to be displayed. Each tile consist of two files with the same name, but different extensions. These are an .xml file and a .png or .jpg file. The .xml file specifies the size of the tile in pixels as well as its geographic extents, as shown in the example below. The .png or .jpg file is the actual map tile image.


If you like to dabble, you can "piggy back" on this mechanism and use it to georeference and display your own map images in HandyGPS.

For large map images you need to split the image into multiple tiles, but even then you should ensure the image is no larger than about 2500 x 2500 pixels or HandyGPS may have problems rendering it fast enough, or may run out of memory. If the image is larger than this, resize it using a tool such as Microsoft Paint.

An example of a tiled map is here. To achieve this result, you need to follow the steps below:
  1. Crop your map image using a tool such as Microsoft Paint so that its pixel width and height are both multiples of 100 pixels. So, if your map image was originally 820 x 661, crop it to 800 x 600.

    If you need to crop the image, you will also need to re-compute the maximum lat/lon values using these two formulas:

    new_max_lon = max_lon - ( max_lon -min_lon )/original_width * width_change
    new_max_lat = max_lat - ( max_lat - min_lat ) / original_height * height_change

  2. Install the ImageMagick command-line tools on your PC. Then, you can use a command like this to split your image (e.g. MyMap.png) into 100 x 100 pixel tiles with each tile appropriately named as tile_row_col.png :
    convert MyMap.png -crop 100x100
     -set filename:tile
     "%[fx:page.y/100+1]_%[fx:page.x/100+1]"
     +repage +adjoin tile_%[filename:tile].png
    

  3. Then, you need to create the XML files for each tile, and the tilelist.txt file which lists all the tiles. To assist in doing this, you can use the CreateKMLGrid tool.

    With this tool, you will first need to enter the lat/lon extents of the full (cropped) image, plus the number of rows and columns of tiles (e.g. 6 rows by 8 columns), then press the "Make tiles" button, leaving the default output filename as "tile.xml". This will write out an XML file for each tile as well as a tilelist.txt file listing all the tiles. This tool assumes your tiles are in the png format and are 100 x 100 pixels. Also the tile files are named tile_row_col.xml

  4. Once you have the image tiles and the xml files describing them, you can copy the folder which contains them all to the HandyGPS/MapTiles folder on your phone and use this new offline map in HandyGPS.


Back to main page

BinaryEarth.net